fredag 13. september 2013

RPRT - Texture 2

This week we where supposed to put our goblet in an environment and use procedural maps to create textures.

Here is my plan this week:

  • Monday: Research and planning (2 hours)
  • Tuesday: Phase 1 (4 hours)
  • Wednesday: Phase 1 (3 hours)
  • Thursday: Phase 2 (4 hours)
  • Friday: Finalizing (3 hours)
To begin with I started sketching down ideas for the environment. I decided pretty quick that I wanted it to be displayed in a museum of some kind. 


The texture I wanted on the goblet was some marble-like texture so it would look like some artifact that was discovered by an adventurer. I also wanted the floor to be mirror-like, so the room would look bigger.

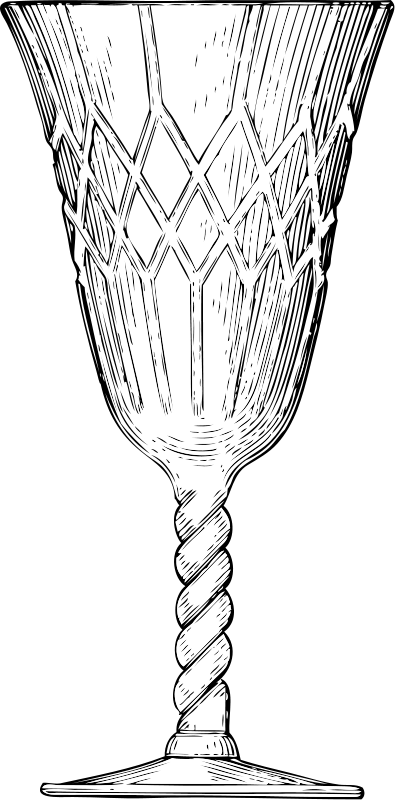
When I was happy with my idea, I made the concept art for the goblet.


We where supposed to make the scene with both original texture and with checkered texture.


After this assignment I still don't think I've got the grasp of texturing and procedural maps. There is still some aspects with unwrapping and texturing I don't understand, but I'll keep trying and pushing on.

fredag 6. september 2013

RPRT - Texture 1

So this week we where supposed to create texture for our goblet from earlier.

For starters I sat down and made a plan on how I should work this week.


  • Monday: Research and planning. (2 hours, as I already made a goblet I just had to collect ideas for material and texture. And I also wanted to put aside some time to watch tutorials and get familiar with unwrapping and adding texture.)
  • Tuesday: Phase 1. (5 hours.)
  • Wednesday: Phase 1. (5 hours.)
  • Thursday: Phase 2. (5 hours.)
  • Friday: Finalizing (4 hours.)
I'm glad I used so much time on phase 1 and 2 since I had difficulties to understand the concept of unwrapping and adding texture, even tough I watched the videos and read all there was about it. 


I sketched up some ideas for material/texture, like wood, metal and glass (both colored glass and regular glass with no color. Here is the references I used.


I figured I wanted to go with the colored glass and make it like a goblet with almost see-through glass.
Then I created the concept art for what I wanted the final version to look like.


The assignment was not only to make a texture, but also make it with checker texture and new/used texture.

And here is my final version with all three textures. 


The old goblet have stains all around it, suggesting that the owner is a heavy drinker. It also features scratched-up bottom.

I also discovered that the texture in 3Ds Max changed simultaneously with the changes I made in Photoshop, when I saved it, that is.


mandag 2. september 2013

Starting With Texture

The assignment for today was to create a box and a sphere to create a dice and an eye using UV unwrapping to add texture. UV translates to a flat 2D surface where all the sides of a box is unfolded, and U means the X-axis and the V is the Y-axis. 

So here is my take on texturing.


Very tempting to create the Neversoft logo with that eye.

For those of you who don't know, here is the logo.


fredag 30. august 2013

RPRT - Modelling 2

This week's assignment was to create a sci-fi/fantasy environment, like a bar, lounge, office, etc.

I knew immediately that I wanted to create a controlroom of some sort. I've been playing a lot of Saints Row IV recently so the desicion was made pretty quick.

Here's how I used my time:


  • Planning & Researching: 4 hours
  • Concept: 4 hours
  • Modelling: About 15 hours
  • Finalizing: 30 mins


First I started looking for references, and here are those which inspired me the most.


And then the thumbnail-sketching began. There was some specific features I wanted to include, like monitors built into the walls, a hologram and desks.


I initially thought about including some monitors mounted on rails up in the roof, but I thought it would be too much considering I've already decided to have desks with monitors, was well as monitors built into the walls.

So here's what I setteled with.


In the middle of the room you can see the hologram, and the lines from the desks that goes into the wall is supposed to be some wires so the workers can send images and info onto the big monitors so all can see. And the desks are linked to the hologram-pod.

Following are the final concept.

A view from the desks, showing the connected hologram-pod, as well as the connected desks.

A close-up on the individual workspace, with floating hologram chairs.

A close-up on the hologram-pod.

I sketched up the concepts in Sketchbook Pro, because you got all kinds of rulers and helpers for creating spheres and perspective. I drew it like a blueprint so it was easier to see what went where, regarding the connectors from desks, hologram-pod, etc.


Above is the finished result. I'm quite pleased with the result and I can't wait to see how it will turn out with lights and materials. I'll upload pictures of that either tonight or tomorrow.


fredag 23. august 2013

RPRT - Modelling 1

M1 - Weekly Assignment: The Goblet


This week we where supposed to create a goblet in 3Ds Max.

First I created a plan for the assignment of how I would work through the week. I usually work from 9 to 15 so that would give me six hours of work a day. But I also had to consider time for daily activities and tutorial videos. So my plan looked something like this:


  • Monday: Research and planning, 4 hours.
  • Tuesday: 1st. phase, 3 hours.
  • Wednesday: 1 st. phase, 2 hours and 1 hour for feedback.
  • Thursday: 2nd. phase, 4 hours.
  • Friday: Finalizing, 3 hours. 


I made a search in google for goblets and here is the ones that really caught my attention:


As I was "googeling" I realized that goblets can have very varied shapes and forms. Some looked like glass for wine, others looked like horns. I became particularly inspired by the goblets with twist.
After the search I created some thumbnail sketches of various goblets.


Even though there was a lot of ideas and much better goblets in the thumbnails, my skills in 3Ds Max is limited so I didn't want to create a goblet that exceeded my skills.
So I started sketching out a goblet that would look nice and which I still would be able to complete.


Here is the reference for the spiral:


I wanted something similar to the column with the cylinders apart, as I think that looks better than if it looks like just one spiral. Like the column beneath here.


Then I started working on the concept art for the goblet.


Since I use Sketchbook Pro when I'm drawing, it was easy to create the stand and top. Because in Sketchbook Pro there is rulers for lines and circles and is much better to design in rather than Photoshop.

So in the modelling part of the assignment I drew the shape of the bottom and used the lathe tool to create the bottom-part of the goblet.


I then created four cylinders and used the twist tool to twist the four cylinders around each other 360 degrees and taper the spiral a bit.


I then drew one more shape and used the lathe tool to create the top of the goblet.


After some minor adjustement on the vertexes and adding a gray color to the goblet, it was finished.

Wireframe top

Wireframe side

Wireframe three-quarter view

Top view

Side view

 Three-quarter view

All in all I would say I'm quite happy with the result. A quite organic-looking goblet.

I've worked 100% after my schedule, asked in forums for help and used the tutorial videos for what it's worth. I'm also quite pleased with my desicion to create a goblet with my current skills in 3Ds Max and not get way ahead of myself. 

fredag 16. august 2013

Day 4

Today the assignment was to add lighting, texture and animation to the cube and sphere. After watching the videos it was quite easy really.


So there isn't much more to say about that.

So now I'm going to use the weekend to relax.

torsdag 15. august 2013

Day 3

Today our assignment was to get familiar with the 3D software, which in my case was 3Ds Max, and take a look at videos that applied to us. In my case I spent much of the day watching introduction videos for 3Ds Max.
We was supposed to create a box and a sphere in the software as well.


It was quite interesting to try a 3D program for the first time. I've used Sketch Up before, but that was more for fun. 3Ds Max is way more advanced and actually much more fun.
I must admit that it was confusing with the quad-view, but I'll get the hang of it eventually.


It felt quite daunting at first when I opened 3Ds Max for the first time, but after watching the introduction videos it was a bit easier to navigate.

Tomorrow there will be a short animation for you to see.

Later!